
Dogs their behavior, movements and educations in order to arrange Dog Training Fence used. There are dog fences used in the house, as well as those produced for houses with gardens. With the development of technology, it is produced to keep dogs around the house electric dog fence it is also widely used.
Dog fences are divided into two according to their intended use.
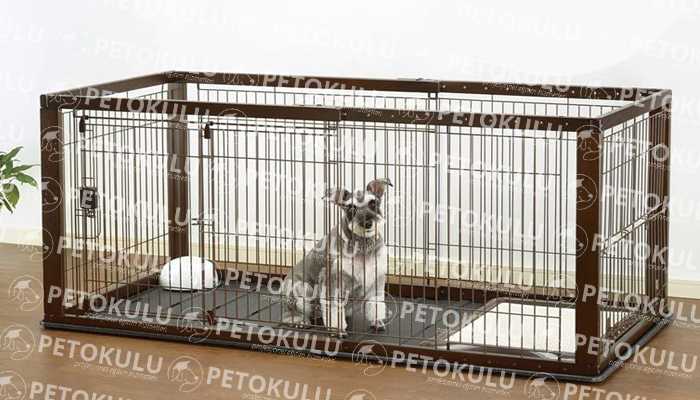
1) Dog Fence Used In House
Dog fences are very useful for dogs, although by some owners it feels like the culprit in the name of incarcerating the dog. Whatever the dog is, having an area of his own will make him feel safe.

If the dog is imprisoned for long hours in this area, then he may have major problems and may begin to feel his psychological problems with aggressiveness, barking and moodiness symptoms.
The benefits of using dog fences used in the home include;
1) Dog fences used in the house serve to distinguish the specific areas of the dog and its owner, to train the dog and to calm the instinct that the dog needs only an area of its own.
2) Dogs rest in dog fences, sleep, hide or eat food. They are a shelter and shelter for dogs.
3) Dogs do not like to pollute the place where they sleep. So inside the fence they learn to hold poop toilet training can be successful in a short time.
4) In natural disasters and in emergency situations, it will be easier to evacuate a dog who has been trained in fence. Uncertainty and fuss that start with being a panic will help to ensure safety quickly with a cooperative dog trained in fence.
5) If your dog is very active at night and you have trouble sleeping, you can prevent the dog you put in the fence from wandering at night.
6) It will be easy for the baby or child who has just come home to meet the dog or the baby to meet the child.
7) After any surgery or intervention, it helps to have a place in the house where the dog can feel safe. Thus, the dog can overcome many psychological problems.
8) If the puppy or adult dog is very mobile and has the potential to cause trouble in the house, it will be safer to stay in the dog fence within periods that you cannot keep under control.
9) Construction causes the dog to hide and feel safe in situations that sound quite loud, such as sirens, thunder and explosions.
10) It allows the dogs who come home to get used to each other without a fight.
Liva Veterinary Ceo Vet. Hec. Selman Odabas, '' Dog fences should be used in dogs from the period of puppyhood. Dog fence, he emphasized that you owners will save many troubles by facilitating the training of your dog.' you should use dog fences.
2) Dog Fence Used in Garden
Garden dog fence allows the determination of the dog's out-of-home boundary. It prevents the dog from leaving the house, prevents him from leaving the safe zone. Many garden houses are surrounded by garden fences, while the houses with open gardens are full of problems in terms of the safety of the dog.
Garden dog fence is also divided into two according to the way of use.
Electric Free Garden Dog Fence (Traditional Fence)
The electric-free garden dog fence, which has been used for many years, is a classic method. Keeping dogs within certain limits is the safest choice for work.
Dog fences, which can be adjusted in height and thickness according to the size of dogs and the feature of jumping, are available from places that do many woodwork.
The general characteristics of the garden dog fence without electricity are as follows;
- The height should be at least 2 meters.
- It should be included in the intervals that the dog can see outside but cannot pass through.
- It has to go deeper to be solid.
- The door height can be lower than the fence, or it can be made so that there is space under it. (This will help the dog and those who will enter the garden know the location of the door.)
- It should be made of water-resistant, low wear and strong materials.
- At least 2 days in times of fence painting should be prevented from transporting the dog to the garden. (Tiner-containing dyes can harm the dog.)
- If the dog likes to dig and is prone to this, a harder material should be used on the bottom of the fence.
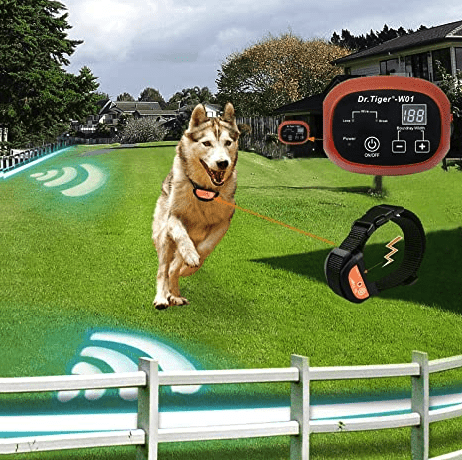
Electric Dog Fence
They are dog fences that allow the dog to determine its boundaries with wires buried under the soil or wirelessly with the help of a transmitter. Thanks to an apparatus attached to the dog's collar, it aims to learn the limits of the dog approaching the borders with a slight shock transmitted by radio waves.
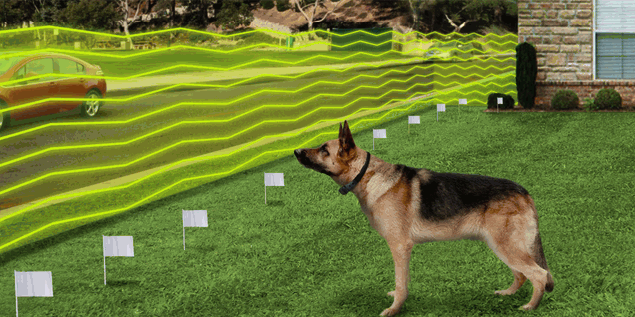
Nowadays, the most used garden in outdoor garden houses is the dog fence. Creating an invisible barrier for dogs, this dog fence is an extremely safe and precise solution for keeping dogs in the safe zone.
This method, which is more useful than traditional garden dog fence, will help your dog learn the garden boundaries more quickly.
Another name for the electric dog fence is the invisible dog fence, as it forms the invisible barrier.
Electric dog fence can be used for two purposes;
1) The exclusion zone is created by making it around the area that you do not want the dog to enter (a towed area, flowering area, etc.).
2) If you do not have a planted area, it is done around the garden and the dog is prevented from going out of the garden.
Use of Electric Dog Fence
Installing electric dog fences is simple but requires some effort. Depending on the size of your garden or the area you want to keep your dog out, there are wired or wireless options.

Wired Dog Fence
It is a form of dog fence that allows to determine the area limits of dogs with radio waves generated by the wired system and obtained from buried wires in the ground.
An apparatus attached to the dog's collar makes disturbing noises as it approaches the boundaries. If the dog that comes to the border, he applies a shock that is transmitted to the dogs by a radio wave that is not painful. Thus, the dog understands that it should not cross that border and stays true to its borders.
How to Install Wired Dog Fence?
Wired dog fence, which is quite easy to install, can take a few days, according to the number of people who help to carry out the installation.
Materials you need:
- Transmitter Box.
- A sufficient amount of wire.
- A sufficient amount of cable.
Cement for embedding the wire.
Flags that determine the area.
Wired Dog Fence Installation Stages
Be sure to get all the supplies when installing your wired dog fence.
1) Install Transmitter Box
The list of tools you will need for the first stage is given below.
- Star-tipped screwdrivers.
- Screw Anchors
- Meter
Working Time - About 1 ~ 2 hours.
Tips:
- The transmitter is better installed in the interior
- Remove moisture
- Near an Exterior Wall
Target: Mount the transmitter in a place where electric power can be accessed, protected from water and easily pass the boundary wire outside.
Find a good place to set up your transmitter.
Your dog fence transmitter requires an independent power supply, so choose an installation site very close to a outlet that you will not need for any other purpose. Also, make sure that the outlet is in a well protected area from moisture or other elements. Preferably, you'll want to install your transmitter indoors (for example, in your garage), inside a better exterior wall, but if necessary, you can install it outside in a waterproof box.
Assembly of Transmitter Box
Measure the distance between the screw holes at the back of your transmitter. Screw the transmitter box to the wall using the included mounting screws. If you do not screw the transmitter directly into a wall stud, install screw dowels before attaching the transmitter to your wall.
Install surge protector (optional)
Some DIY kits come with an integrated surge protector; if your DIY kits don't include one, you need to purchase additional surge protector . However, it will only be needed in areas that often experience lightning strikes or in large gardens. This configuration protects both the transmitter and the electrical system of your home.
Connect the transmitter and pull the cable out
In your transmitter box, there is a place to fasten both ends of your boundary wire. If the transmitter box is installed indoors, you need to pass the wire outside. You can drill a hole in the wall or use another opening path available.
2) Cable Preparation
Before embedding or mounting the boundary wire in one place, we first place the wire above the ground and connect it to the transmitter box to check if everything is working before we start placing the wire.
2. The list of vehicles you will need in the stage is given below.
- Waterproof wire nuts .
- Wire cutter/scraper
Working Time - About 1 ~ 2 hours.
Tips:
- Upgrade your wire to 14 ~ 16 Gauge.
- Consider the extra exclusion zone when estimating cable length.
- Adjust the level of consistent measurement. (limit wire and twisted wire)
- Make sure that no water will pass through the wire insertion process.
Target: Make sure the cable is ready, work perfectly with the transmitter and receiver bracelet.
Upgrade your cable
If your DIY kits contain 20 Gauge wires with thin wires, consider upgrading to 14 Gauge direct-embedding-grade wires . The upgraded cable will increase your start-up cost, but it will cover its own expense in the long run as you will have much less cable break problems in the future.
Create your Twisted Wire.
When you build your own dog fence, you will probably have courtyard areas where you need to lay the wires to keep your dog away. You can also use twisted wire to connect one loop to another loop.
Fortunately, there is a simple solution! When you bend the two-length wire together, it cancels out the signal emitted by each of these wires.
Add all parts of the wire together
Now that you have both twisted wire sections and ordinary border wire sections, you will need to join the sections of these wires together. It is important that you use waterproof cable convectors. On rainy days it will help prevent the system from short-circuiting.
Connect these cables to the transmitter box
Open the transmitter box. The transmitter must show that everything is in order, If you hear a loud beep when you connect, this is your wire break alarm. There is a disconnect somewhere on your border wire.
If the transmitter indicator is normal, now test the system using the apparatus to double-check that everything is working. When you approach the border, the apparatus must beep.
3) Embedding Cables into Ground
Before you start digging, take a good look at your configuration plan for where you want to place the wire and make last-minute adjustments.
3. List of vehicles you will need at the stage.
- Hire a duct digger or power trimmer if your garden size is large.
- Rowing (if digging by hand)
- Digging (handle digging and optional if the floor is too hard)
- Extracting tool or wood paint mixer (help to bury the wire)
- Lawn staples (if you want to install the wire on the floor)
- PVC pipe (optional if above ground)
Required Working Time - About 5 ~ 15 hours, depends on the size of the garden.
Tips:
- Underground or above-ground burial may be preferred. (depends on the condition of your garden)
- Rent an automatic machine or dig manually, (depends on the size of your garden)
- Optional protection method if above ground
Target: According to your configuration plan, you should place your limit wire well.
Hire a channel digger or use a power trimmer
A ditch will automatically dig a ditch, lay the cable and bury the cable. A power cutter digs a shallow ditch, then lay and bury the cable manually.
Dig ditch (With hand)
Open the excess length wire that you will attach to the transmitter box, then extend the wire as a guide along the first 50 meters of the road.Create a flat trench with a depth of 3-6 cm.
Burry the cable
Insert the wire into the trench and cover the wire by standing on the ground around the trench. The wire only needs to be below the surface, but it will be more protected if it is deeper. The fastest thing to do (in the case of hand digging) is for a person to cut the trench and put the second person on the ground with the wire cut.
You can choose to mount the cable above the ground
In areas that are not mowed or in wooded areas where the wire is difficult to bury, you can lay your wire on the surface of the floor and staple it in place using lawn staples .
Rodents and other wild animals can gnaw wire if it is easily visible and accessible in areas where the wire rises from the ground near the plug. To deter pests and protect against weather, use PVC pipes to protect cables of any ground level.
4) Connecting and Testing System to Transmitter
Here's 4. List of vehicles you will need at the stage.
- Transmitter/cabling system ready installed.
Border Flags
Required Working Time - About 1 hour ~ 3 hours
Tips:
- If there is any rupture, it most likely occurs at additional points.
- Set the correction zone (border width) to 'the widest' for educational purposes.
Target: Make sure the system is ready for everything and that the boundary marks are in place.
Test if the fence function works, detect if there is any breakage
Connect and open the boundary wires to the transmitter box, check the indicator on the transmitter box if there is green light. If not (that is, if there is broken wire), check the joints where you join two pieces of wire.
Set the delimitation zone (alert zone or border width)
Set up on transmitter for limitation zone (signaline border width). Keep it as wide as possible for educational purposes (both sides of the wire).
Sew the Border Flags
Use the receiver bracelet to test the correction zone, move it closer to the limit until you hear the beep, then sew a flag. Repeat this process to test different parts of the boundary area until the entire "loop" is fully marked (Try to place the flags as close as possible).
That's all... You finally managed to install the wired dog fence! Now you can place the apparatus on your dog's leash and watch your dog's behavior, enjoying your success.
Wireless Dog Fence
Wireless electric dog fence installation, which is simpler to install than the wired dog fence, is briefly as follows:
Find a Good Place to Install Your Data
The first step is to find the right place to place your transmitter box. Remember that the location of the transmitter will be the center of the pet protection zone.
Some criteria for where the transmitter will be located:
- Your dog fence transmitter requires a special power supply. Therefore, choose an installation area very close to a outlet that you will not need for any other purpose. Also, make sure that the outlet is in a well protected area from moisture or other elements.
- Ideally, the interior of an outer wall is better; avoid having many concrete walls between the transmitter and the yard.
- Metal devices such as refrigerators should be kept at least 5 meters away from the transmitter, preferably 7 meters or more.
Determine the Limit of Your Coverage
It takes two people for that. As one person sits at the transmitter point, the other walks to the boundary and waits for the beep signal and static shock of the boundary line.
Make sure you walk around your entire property so you know where it stands and starts. Two people should communicate with each other about the apparatus response (beep sound) and then adjust the radius.
Make sure the circular area covers the majority of your property. 2. You can purchase the transmitter if necessary and cover a larger area.
Install the Transmitter
Once you confirm that you have found the perfect location for the Transmitter Box, you can install the transmitter.
Depending on the wireless dog fence you get, it may be possible to mount it on the wall using screws or stick it to the wall using adhesive strips. Because one of the advantages of a wireless fence is portable, you can also keep the unit on a table or somewhere else. .
Sew the Border Flags
This is the last step!
- Use the receiving apparatus to test the correction zone, move it closer to the limit until you hear the beep from the apparatus, then sew a flag.
- Repeat this process to test different parts of the boundary area until the entire "circle" is fully marked.
- Try to place the flags at a maximum of two meters apart.
That's all... You managed to install the wireless dog training fence. You can now monitor your dog's behavior and reactions, and let your dog free easily in the garden.
Do Electric Dog Fences Really Work?
Many people think that the best way to keep their dogs in their yard is an invisible underground wireless electric fence. However, they are not as effective as you think. Statistics show that invisible wireless electric fences are only 70% effective.
What Is the Cost of Underground Invisible Electric Dog Fence?
The typical cost of installing an invisible dog fence is from 950 to 1500 dollars. However, it varies according to the size of the garden, the width of the area you will apply and the quality of the materials you will use.
Wired or Wireless Is Dog Fence Better?
Wired dog fence can be more costly than wireless dog fence. In addition, labor and installation difficulties are more concentrated in wired dog fences. Depending on the size of your garden and the state of your budget, wireless dog fences may be preferred.